How to setup AWS GuardDuty | Step by Step Tutorial – Aws Security Series
Aws GuardDuty is a threat detection managed service, which continuously monitors your VPC logs, Cloudtrail Logs, and DNS logs to find out unusual behavior or malicious activities. Aws GuardDuty helps AWS customers to protect their AWS workloads.
It doesn’t matter if you are preparing for the “Aws Certified Security Speciality Certification” or Designing security for your organization ‘s Aws Account security, “AWS GuardDuty” is an essential part of the Aws Security Designing process.
In this detailed tutorial, we will cover the following topics.
- Understand the Aws GuardDuty.
- Enable Aws GuardDuty
- Learn how to Add White Listing and Avoid Unnecessary Threat Notifications.
- How to Configure Centralized Threat Notification.
Now without wasting any more time, Let’s begin with the Tutorial.
What is GuardDuty? How does it work?
We can understand Briefly what GuardDuty is and how it works through the below-mentioned diagram.
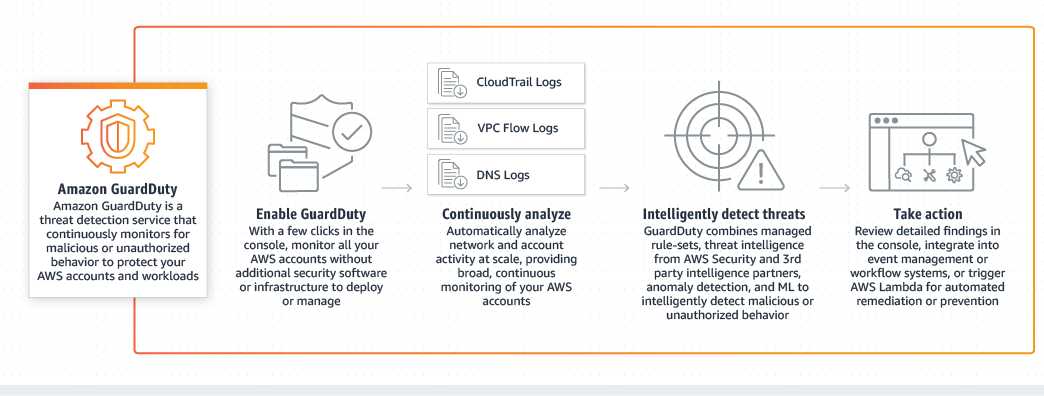
In the diagram, you can see that when we enable GuardDuty it communicates with three log services i.e VPC Flog logs, CloudTrail Logs, and DNS logs. Based on it’s managed Rule-sets, threat Intelligence from AWS, and other partners, it detects Anomalies, unauthorized behavior.
It can detect various types of threats like Bitcoin Mining, SSH brute force. While Providing Security Consultations to our client, we have often found that Hackers try to breach the Servers and use it for Bitcoin Mining. Now Let’s move on to the next part of the Tutorial, which is how to Enable GuardDuty on your Aws Account.
Step 1: set up GuardDuty?
Enabling GuardDuty on Aws is Quite easy, this is one of the reasons why we recommend using GuardDuty instead of other commercial Products. It’s quite simple to set up and cheaper than other products. Now, follow these steps to enable GuardDuty on the account.
- Login in to your Aws Account.
- Search for GuardDuty in the Aws dashboard.
- now on the left-hand side of the GuardDuty Dashboard, click on “Enable GuardDuty”. It provides information that will Analyze the Vpc, Cloudtrail, and DNS query logs.
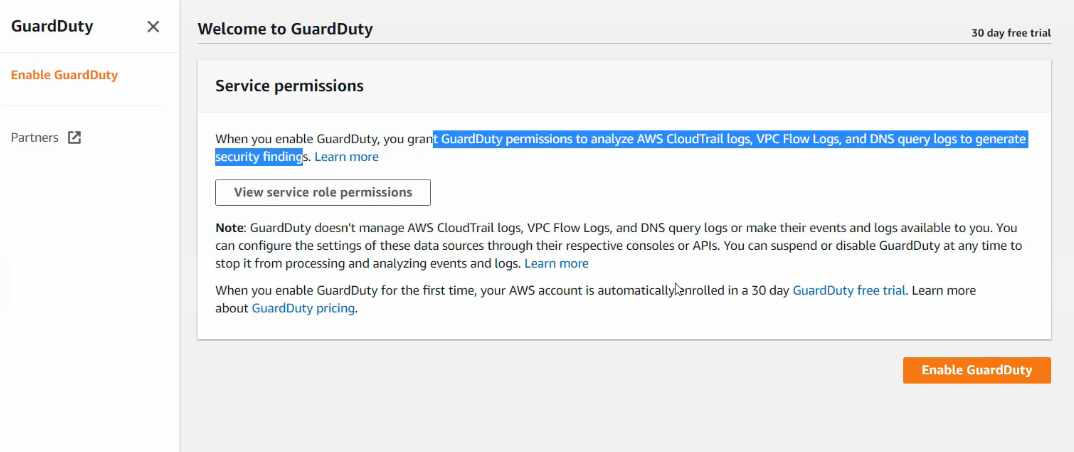 It will Enable the 30-day free trial. Before Enabling the service, make sure you have enabled CloudTrail Logs and VPC flow logs on your account.
Step 2: Analyze the GuardDuty Findings
Now, we have enabled GuardDuty on our account, the next thing we need to understand is how the findings appear in the dashboard. If you didn’t get any findings in the dashboard yet, then you can simply enable the Sample Findings from the dashboard. To Enable Sample Findings, follow these instructions.
- Go to the GuardDuty Dashboard.
- Click on settings.
- Find “Generate Sample Findings”
- Click to generate samples.
The Sample Findings are going to look like this.
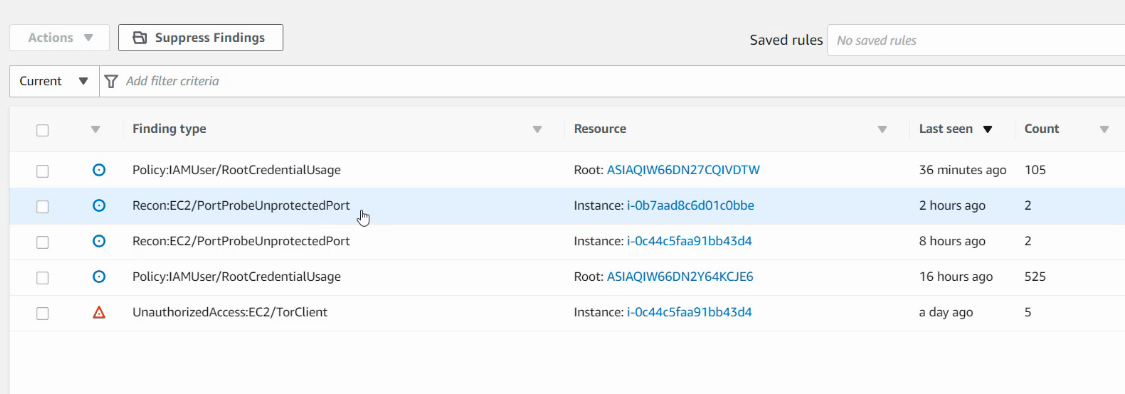
In the example, you can see that there are multiple findings. AWS GuardDuty divides everything into critical, Low, and Severity. By Clicking on it you can get more information about the threat and decide how to fix the issue.
Limitations of Guard Duty:
Guard Duty will only monitor Route53 for DNS Logs.
A lot of organizations make use of Active Directory DNS. The logs from these servers will not be monitored. In order to overcome this limitation Organizations use Third party Threat Analysis tools like Splunk for DNS Security. Another important limitation of GuardDuty is that it doesn’t monitor the Ec2 instance logs, thus considering third-party tools like Splunk for certain services is a good option.
However, even with the limited log files, it gives you very good insights into the threat. Enabling it for the production server account is really recommended.
Step 3: Handling Guard Duty Alerts
Amazon GuardDuty can generate a wide variety of alerts. Some of these might be true but you might want to ignore them.
Example:
Let’s say there is a central Security server that performs port-scans as part of penetration testing on all the production servers. This can lead to GuardDuty alerts like port scans or brute force being triggered. Now how to overcome this problem? The best thing to do is to white list certain IP addresses of your organization. Let’s learn how to add a Trusted IP List in the dashboard.
Managing Trusted IP List
AWS GuardDuty allows customers to add their own “Trusted IP” list. It does not generate findings for IP addresses on trusted IP lists. If you want to add the Trusted IP address list, then create a text file on your machine and upload it on the Lists Section of the GuardDuty Dashboard. The IP format should be like the below-mentioned example.
Example Trusted IP List: 116.75.25.50/32
Step 4: Managing GuardDuty Findings Centrally.
Now If you have multiple Aws accounts in your organization, then managing the findings of every individual account can be a huge problem. AWS team has taken care of this problem, we can manage multiple GuardDuty Findings from a single Aws account. Let’s understand how to complete this task.
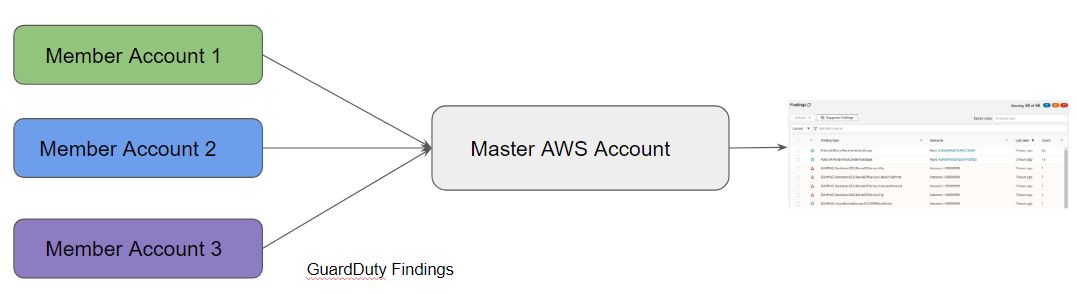
In this architecture, the Guard Duty findings from all the AWS Accounts will be sent to the Central AWS account. All the Clients are known as Member Accounts in the AWS, all the Findings from these accounts will be redirected on the Master Aws Account Dashboard. Follow these instructions to add Member accounts in the Master Aws Account.
- Go to the Guard Duty Dashboard.
- Click on “Accounts ” from the left sidebar.
- You will get an option to add Members.
- On the next screen you will see two options, “Member Root Account ID” and “Member ‘s Email Address“
- Add these values and click on the “Next” button.
- After successfully adding the member, you will be able to see the member’s account ID in the list. The “Invite” button will be available.
- Click on the “Invite” button and add a custom message and send it.
- Now hit the back button, you will get a message that the Invitation is still pending.
- To accept the invitation to the member account. Login into it and go to Guard Duty Dashboard.
- Go to the Accounts section.
- Here you will see the invitation from the “Master ” account.
- Just click on the toggle button and Accept the invitation.
- Go back to the Master ‘s Dashboard, you will see that in the list the status has changed to “Enabled”.
- Now Refresh, you will be able to see findings from the Member account in the Master Dashboard.
Conclusion: AWS Guard Duty is really an awesome service at a very reasonable price. We can enable it with just a click and managing it is very easy as well. We hope this article will help you to configure AWS Guard Duty on your organization’s account. To explore more on Aws GuardDuty checkout the AWS official website documentation.
https://docs.aws.amazon.com/guardduty/latest/ug/guardduty_settingup.html
If you faced any issue or want to know more, please comment on this article, we will try to get back to you asap. If you like this article then do check out our other Aws Tutorials.
https://www.myserverfix.com/category/aws-tutorials/